How to Start a Self-Hosted WordPress Blog
In addition to generating ad revenue, blogging can be extremely valuable for your personal growth. As part of the process of writing in-depth blog posts, you may shift away from short videos and social media posts, and start consuming more in-depth, long-form content instead. You’ll become a subject-matter expert on your blog niche, and if you’re a lifestyle blog writing about personal experiences, you’ll gain self-awareness through introspection. You can even blog anonymously if you’re not sure about maintaining the blog long-term, or shy about revealing your inner thoughts. The topics that bloggers feel shy about posting are often the ones that readers are most interested in.
Blogging also makes you more knowledgeable about SEO, especially if you are using self-hosted WordPress and coding things yourself. This can lead to job prospects in either copywriting or web development. As a non-native English speaker myself, writing blog posts has been a great way to improve my vocabulary and communication skills.
In this post, I will explain how to build a self-hosted WordPress blog that ranks on Google and generates ad revenue as soon as possible.
Domain Name and Hosting
If you haven’t already, start by getting a domain name and hosting. You can choose from a bunch of providers such as HostGator, Hostinger, Bluehost, GoDaddy, etc. I used HostGator simply because I had a discount code for them.
Install WordPress
Once you have the domain name and hosting, go ahead and install WordPress. It may take a few minutes, but eventually you’ll be able to login to WordPress at yourdomain.com/wp-admin/
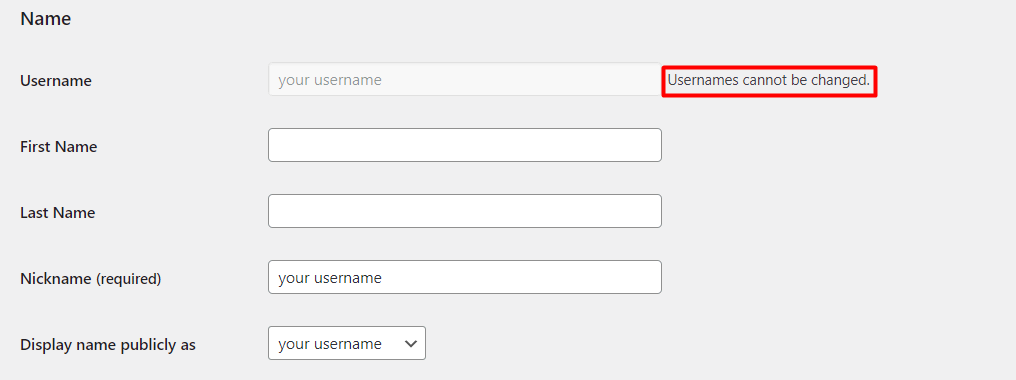
If the hosting provider already set up the login credentials but you want to change the username, that isn’t possible directly in WordPress. You’ll find that the option to edit username is greyed out. Instead, access phpMyAdmin through your hosting panel, and find the users table where you can then directly edit the username.
Next, install plugins and delete any pre-selected ones that you won’t use. I recommend keeping SSL Insecure Content Fixer for security reasons and installing Yoast SEO because it will help to generate the sitemap.
Customize Theme
Pick one of the themes available in WordPress, upload a pre-made theme, or build your own. I previously borrowed Luxeritas theme for my second blog. The nice thing about WordPress, unlike most other website builders, is that you can access the functions.php via Theme Editor and customize even pre-built themes. If you use a pre-made theme, watch for theme updates from the developer and keep track of any custom changes on the theme files.
Resolve any compatibility issue between your plugins and theme as soon as they arise. For example, the Luxeritas theme has built-in SEO functionality but I am also using Yoast SEO plugin. Without any customizations, this would cause duplicate meta description tags. There are 2 approaches to resolving this issue: remove meta description from the Luxeritas theme file, or block the Yoast SEO meta description by adding a custom plugin.
<?php
/**
* Plugin Name: wpse425362
* Description: Site specific code changes for example.com
*/
if (!defined('ABSPATH’)) exit; // Exit if accessed directly
/**
* Removes the meta description generated by Yoast
*
* @param array $presenters the registered presenters.
*
* @return array the remaining presenters.
*/
function wpse425362_remove_description( $presenters ) {
return array_map( function( $presenter ) {
if ( ! $presenter instanceof Meta_Description_Presenter ) {
return $presenter;
}
}, $presenters );
}
add_action( 'wpseo_frontend_presenters’, 'wpse425362_remove_description’ );
?>
Add Custom CSS
If you’ have a vision for your WordPress site but your out-of-the-box WordPress theme only gets you about 90% of the way there, custom CSS will bring that up to 100%. Custom CSS will let you override or add to the existing styles so you can tweak things exactly how you want.
Every WordPress theme already has some CSS baked in. That’s why different themes have different colors, fonts, and layouts right out of the box. But what if you want to tweak something the theme doesn’t let you change in the settings? That’s where custom CSS comes in. With custom CSS, you can make visual changes to your site without needing to mess with your theme’s code. For example, you can change fonts, tweak layout spacing, or hide default elements you don’t want. ※Use this last one responsibly – especially if you’re removing theme or plugin credits, because some licenses require attribution.
You’ll need to find the class or ID of the specific element you want to style. You can do this by using your browser’s Developer Tools. Open your website in a browser, right click on the element that you want to style (like a button, text, or image), then right click on it and select Inspect. This opens the Developer Tools pane, which will show you the HTML structure of the page, and the element you clicked on will be highlighted in the html code. For example, <div id="footer-widget"> or <div class="footer">
Quick warning, you shouldn’t add custom CSS directly to WordPress template files like header.php and footer.php. It may not break your site, but it’s not recommended.
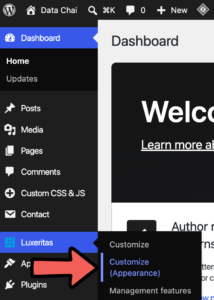
So where can you add custom CSS? In classic editor, click on your theme and then Customize (Appearance) in the left menu. This will open your WordPress site with the Customization menu on the left. Find Additional CSS in the menu, and input your custom CSS in the textbox. The site preview will update instantly without reloading the page or publishing your Additional CSS. When you’re happy with how it looks, go ahead and click publish.
When you’re managing styles across many pages or elements, a long block of code in the customizer can quickly become hard to read, edit, and maintain. If you’ve been adding custom CSS to your WordPress site and notice that the Additional CSS panel is starting to look like a novel, it might be time to to use a plugin.
Plugins give you better organization and control over your CSS. There are several plugins available in WordPress that allow you to add custom CSS easily. The one I personally use is called Simple Custom CSS & JS.
The biggest advantage over the default Additional CSS panel is being able to split your code into multiple files. For example, you could have separate CSS files for your homepage, blog layout, and contact page. This makes your CSS cleaner, more modular, and much easier to debug or update down the road. If you’re building out a larger site or just love being organized, I recommend using a plugin.
Add Sitemap to Google Search Console
Earlier in this post, I recommended using Yoast SEO plugin to generate the sitemap. One known minor bug, however, is that the homepage appears in both the page and post sitemaps. To keep the homepage in the page sitemap and just remove it from the post sitemap, I added this snippet to functions.php
add_filter( 'wpseo_sitemap_post_type_archive_link', 'custom_wpseo_post_type_archive_link', 10, 2 );

function custom_wpseo_post_type_archive_link( $link, $post_type ) {

    if ( $post_type === 'post' ) {

        return false;

    }

    return $link;

}

add_filter( 'wpseo_sitemap_entry', 'remove_homepage_from_post_sitemap', 10, 3 );

function remove_homepage_from_post_sitemap( $url, $post, $context ) {

    if ( $context === 'post' && $post->ID === get_option( 'page_on_front' ) ) {

        return false;

    }

    return $url;

}
Once your site is ready for launch, publish it and add the sitemap to Google Search Console. You’ll first be prompted to verify domain ownership via DNS record, which can be done by adding a TXT record in cPanel Zone Editor. It may take some time for the verification to be picked up by Google. If you’re unsure, replace yourdomain with your actual domain in the url below to check that the TXT record was properly added.
https://dns.google/query?name=yourdomain.com&type=TXT&dnssec=true
Optimize for SEO
I won’t cover the basic SEO concepts like keyword research and backlinking in this post, but here are some initial SEO settings to consider.
Categorize your blog posts so that readers can easily navigate the site. When doing this, you usually shouldn’t noindex the category pages. Google treats noindex pages as nofollow, so it can hurt the site structure. However, if the category pages are not part of the structure (i.e. not reachable through any link on the site), then it’s fine to noindex them.
The more you can publish without compromising on quality, the better. Posting frequency does not matter for SEO so if you have some pre-written posts, go ahead and publish them all at once. Since it can take several weeks or months for new pages to rank on Google even if they are SEO-friendly, scheduling your posts for a later time just causes an unnecessary delay. Generally, don’t mess with the post dates like scheduling or back dating unless you have good reason to.
If your goal is to rank for low-competition keywords, you should start seeing results within a few months. But if your benchmark for SEO success is lead generation or conversions, then it may take at least 6 months to start getting results.
Monetize Your WordPress Blog
Once your blog starts gaining traction, you may think about earning some extra income from it, via ad monetization or affiliate links.
Ad Monetization
Google AdSense was previously said to be the easiest ad network to get approved on, but these days, more that 95% of the applications result in rejections. Whether you choose to apply for AdSense or an alternative platform, here are some point to keep in mind, to increase the likelihood of getting approved.
Number of Posts
Google’s stance is that your blog should offer unique and valuable content, and provide a positive user experience. There are no official requirements but the general consensus among bloggers is that your domain should be at least 6 months old, and have 15-20 posts in the same category, which can definitely be indicative of valuable content. However, I’ve heard of blogs with less than 10 posts getting approved, and blogs with nearly 100 posts getting rejected.
Niche
AdSense approval usually doesn’t depend on the niche, unless you are writing about controversial topics. As stated above, the quantity and quality of the content and traffic are much more important. However, some niches may be more difficult to get approval because there are already many other, similar websites. These niches include cooking recipes, travel, celebrities, animals, tech and programming, and YMYL.
Required Pages
To increase your chances of AdSense approval, make sure your website has certain essential pages such as privacy policy, contact form, and about us. These pages provide valuable information to your visitors and demonstrate that your website is legitimate and trustworthy. If you blog anonymously, there is no need to publish your personal information, but at least share your background, experience, and any qualifications relating to your niche.
Affiliate Links
Affiliate links, such as Amazon associates affiliate links, can be a great way to monetize the website traffic on your blog. There are several plugins available for adding affiliate links to a WordPress site, such as ThirstyAffiliates or Affiliate WP. However, these are mostly paid plugins. In this section, I will share how to use embedded code to add affiliate links to a WordPress site for free.
In addition to Data Chai, I actually have a second blog in Japanese, and some posts include Rakuten affiliate links. However, the method that I describe below should be applicable for any affiliate programs.
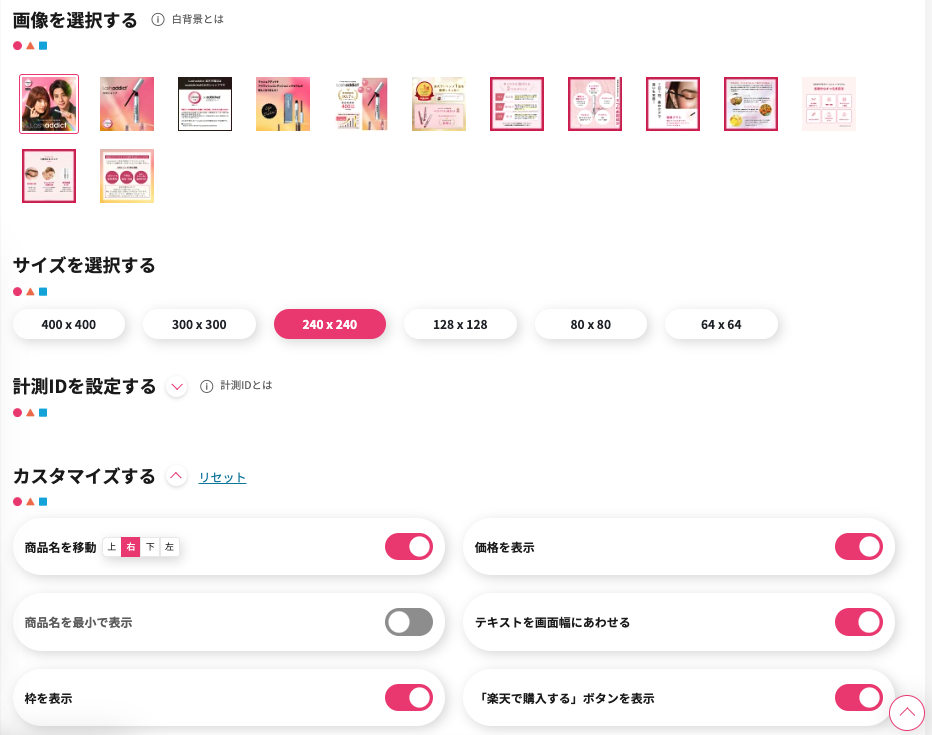
For this example, I have chosen an eyelash serum as the product that I’m going to post an affiliate ad for on my blog. On the Rakuten affiliate platform, I can customize the image and dimensions, check the preview of the affiliate link card, and generate the embed code.
The official instructions simply say to copy the embed code into your blog post and you’re good to go. Well, this looks fine on desktop, but the auto-generated embed code is not optimized for mobile. On mobile, this horizontal affiliate link card would get cut off.
So, I customize the affiliate link card to make it vertical. While I’m at it, I hide the product price, since doing so usually results in more clicks. Below is the mobile version that I created.

In my WordPress theme, I have the below snippet in the header so that I can easily reference it on posts. If you don’t already have something like this, and it’s your first time using this method to add mobile-responsive affiliate links, then you’ll need to add the below snippet to add-header.php
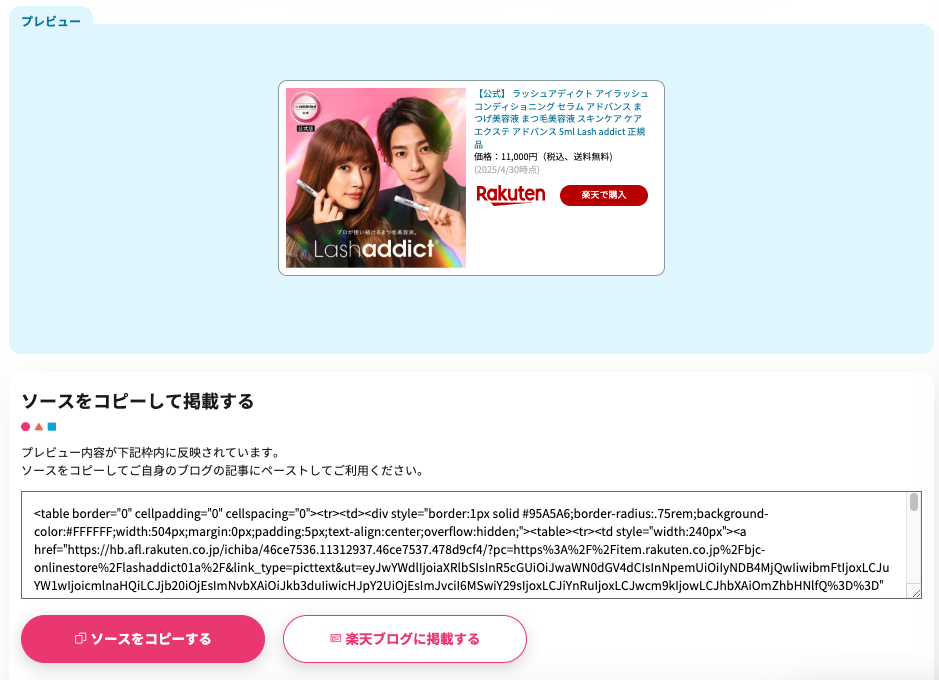
Then in my post, I use the below template to make the affiliate card mobile-responsive. The auto-generated embed code does not include alignment, so I also use this template to center align the affiliate link cards.